Amazon has officially announced Ruby support for AWS Lambda. Here’s a simple guide to using these technologies to create a Twitter bot that can post for you automatically.
It used to be that service providers such as Google, Amazon, and Microsoft only supported languages like Java, Python and JavaScript. Not any longer! On the 29th November, Amazon expanded its support to include Ruby for AWS (Amazon Web Services) Lambda.
With that, I wanted to revisit a blog post I wrote about how to build a serverless Twitter bot with Python and Google Cloud. That post was written for Google Cloud and outlines how to create a Twitter app, configure Google Cloud, write the main logic for the bot, deploy the bot and set up scheduling for automation. Please give it a read if you want a bit more context on serverless applications and the purpose of Twitter bots.

In this post, we’ll be covering the same topics, but using AWS Lambda and Ruby instead.
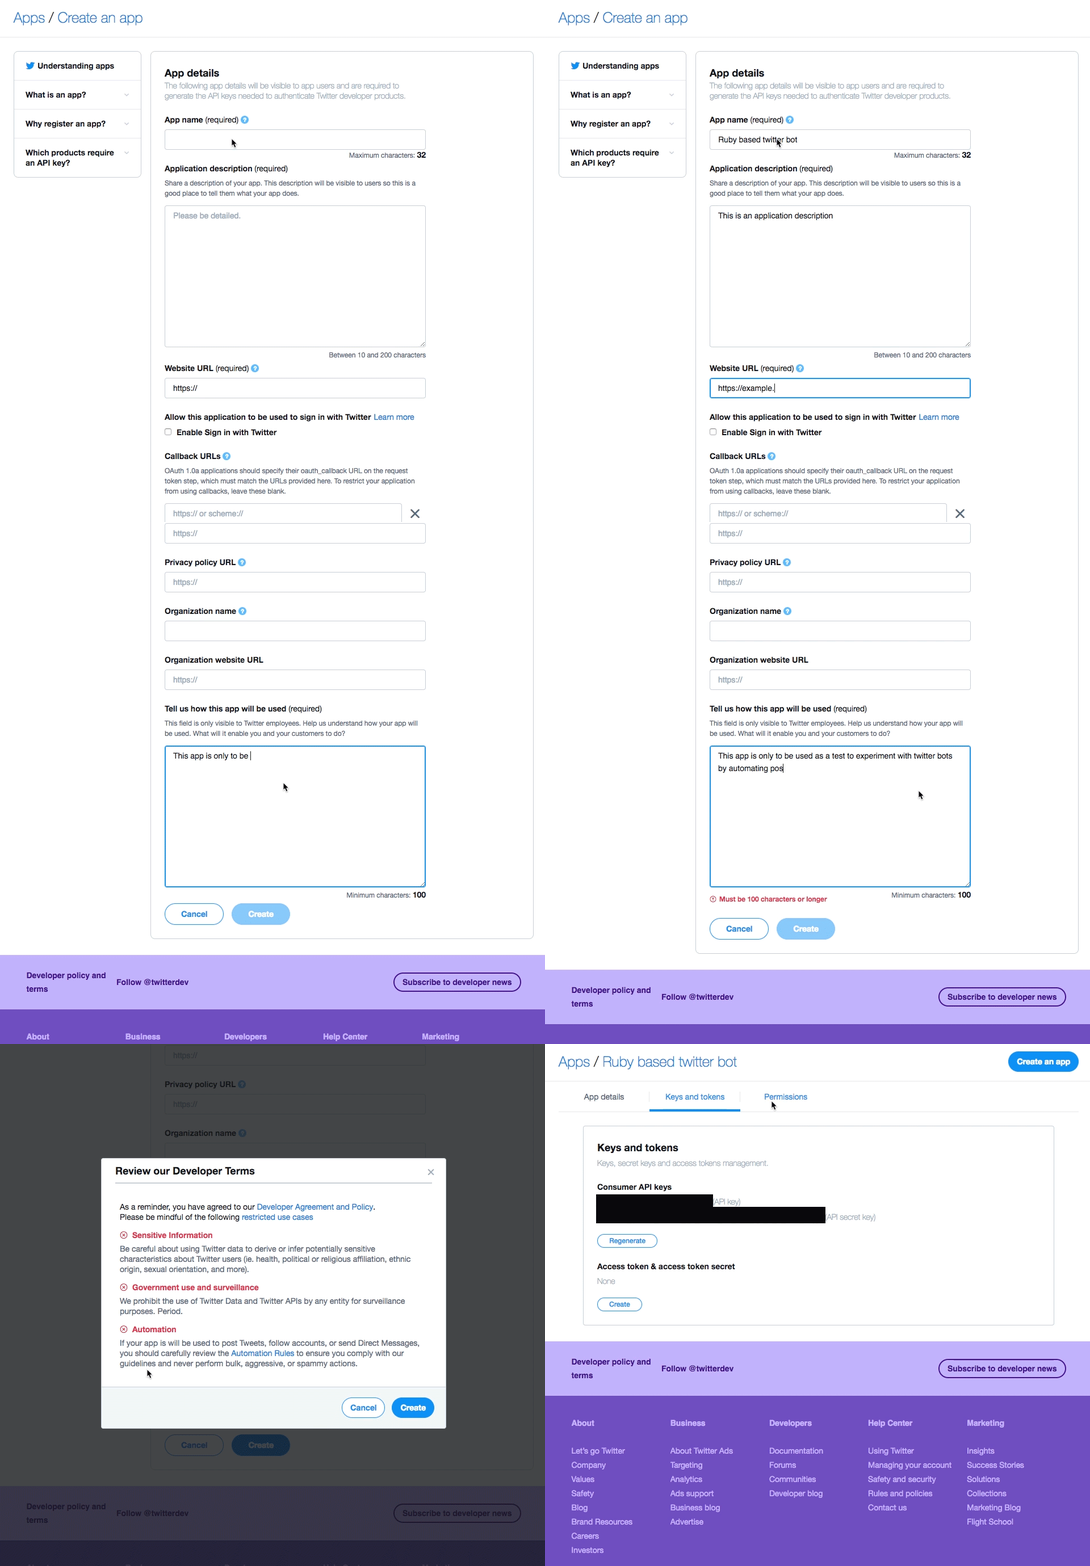
1. Become a Twitter developer

The first step is to register as a Twitter developer so you can access their APIs. Once you’re approved, you’ll be able to generate a set of keys that you can use to connect to Twitter.
2. Set up AWS Lambda
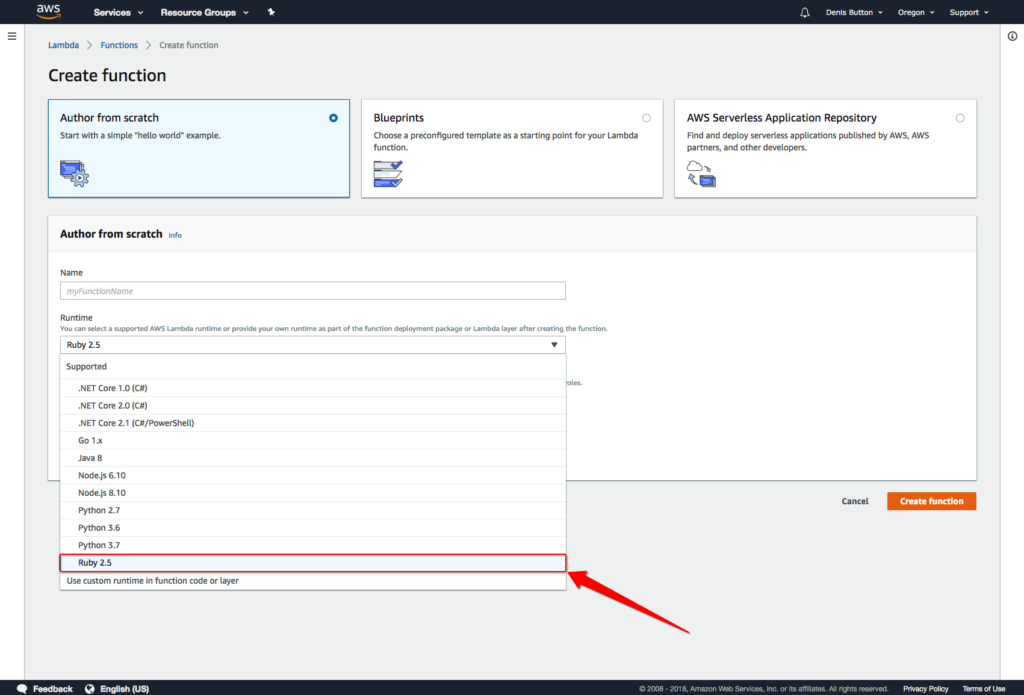
The video below shows how you can create a function within AWS Lambda with a Ruby runtime. We need this function so we can deploy to it from the CLI (command language interpreter). You can also use the CLI to create a function – make sure you have the AWS CLI installed first.
3. Create your bot
Now that all the setup is out of the way, it’s time to start with the meat of our application.
First, create a working directory – mkdir twitter_ruby_bot – then within that directory create your Gemfile – touch Gemfile – and add the following:
# Gemfile

source 'https://rubygems.org'
gem 'twitter'
You can now configure your ENV variables and add the keys given to you when you created the Twitter app. You can do this from your Lambda function page (scroll down towards the bottom):

Within your working directory, create a new file to house the make logic for your bot – touch lambda_function.rb – and add the following:
require 'json'
require 'twitter'

def lambda_handler(event:, context:)
  client = Twitter::REST::Client.new do |config|
    config.consumer_key        = ENV['CONSUMER_KEY']
    config.consumer_secret     = ENV['CONSUMER_SECRET']
    config.access_token        = ENV['ACCESS_TOKEN']
    config.access_token_secret = ENV['ACCESS_TOKEN_SECRET']
  end

  client.update("Hello World, from lambda running ruby runtime")

  { statusCode: 200, body: JSON.generate("Tweet posted!") }
end
This is a simple script that will pull in the twitter gem, create a new Twitter client with config from ENV variables, and finally make a post to Twitter.
4. Deploy to Lambda function
Now that the script is written, we’re ready to deploy the function.
First, make sure that you have AWS CLI installed. To test that everything is working, call list-functions to see the new function you created above aws lambda list-functions --region=eu-west-2 --profile denis_lambda. I’m using the --region and --profile flags because I have Lambda functions with different users and a region is required.
If all goes well you should see something similar to this:
{
    "Functions": [
        {
            "FunctionName": "twitter_bot_ruby",
            "FunctionArn": "arn:aws:lambda:eu-west-2:...:function:twitter_bot_ruby",
            "Runtime": "ruby2.5",
            "Role": "arn:aws:iam::...:role/service-role/twitter_bot_ruby_role",
            "Handler": "lambda_function.lambda_handler",
            "CodeSize": 6302663,
            "Description": "",
            "Timeout": 3,
            "MemorySize": 128,
            "LastModified": "2018-12-13T13:48:38.174+0000",
            "CodeSha256": "...",
            "Version": "$LATEST",
            "VpcConfig": {
                "SubnetIds": [],
                "SecurityGroupIds": [],
                "VpcId": ""
            },
            "Environment": {
                "Variables": {
                    "ACCESS_TOKEN": "...",
                    "ACCESS_TOKEN_SECRET": "...",
                    "CONSUMER_KEY": "...",
                    "CONSUMER_SECRET": "..."
                }
            },
            "TracingConfig": {
                "Mode": "PassThrough"
            },
            "RevisionId": "..."
        }
    ]
}
Why Docker is required
We will need to run a ‘bundle install –deployment’, so it creates a vendor directory with our gems in it. This ensures that all the dependencies are included in the function deployment package.
While this includes your gems in the local folder, it will only include the native extensions for your platform. If you’re on macOS, this is Darwin. You’ll need to repeat the process on a 64-bit x86 Linux environment (the one Lambda is running on).
This is where Docker comes in. Don’t worry about setting up complexing docker images – all you need to do is install Docker by following this guide.
Back in the working directory for the bot, create a deploy.sh – touch deploy.sh – file and add the following:
# deploy.sh

lambda=${1%/};

echo "Running bundle install deployment";

docker run -v pwd:pwd -w pwd -i -t lambci/lambda:build-ruby2.5 bundle install --deployment

if [ $? -eq 0 ]; then
  echo "done";
else
  echo "bundle install failed";
  exit 1;
fi

echo "removing old build"
rm build.zip;

echo "creating a new build file"
zip build.zip *  -r -x .git/\* \*.sh specs/\* tests/\* \*.zip

echo "Uploading $lambda to $region";

aws lambda update-function-code --function-name $lambda --zip-file fileb://build.zip --region=eu-west-2 --publish --profile denis_lambda

if [ $? -eq 0 ]; then
  echo "## Deploy successful ##"
else
  echo "Deploy failed for = $lambda"
  exit 1;
fi
The script may look complex but it can easily be broken down:
docker run -vpwd:pwd-wpwd-i -t lambci/lambda:build-ruby2.5 bundle install --deployment
- Run a dockerized bundle with deployment flag within a Lambda image – this will download the gems to the local directory instead of to the local systems Ruby directory, using the same OS environment as Lambda so that it installs the correct native extentions. This ensures that all our dependencies are included in the function deployment package and the correct native extensions will be called.
rm build.zip;
- Remove any old build zip
zip build.zip * -r -x .git/\* \*.sh specs/\* tests/\* \*.zip
- Create a new build zip to be deployed to your function
aws lambda update-function-code --function-name $lambda --zip-file fileb://build.zip --region=eu-west-2 --publish --profile denis_lambda
- Run the AWS CLI command needed to deploy your function – this CLI command is very specific, with a defined region and profile. You should change these accordingly.
Before you can run the deploy script, you’ll need to give it the permissions necessary with the following command – chmod +x deploy.sh. Finally, run it with the following command – ./deploy.sh twitter_ruby_bot
5. API Gateway and scheduling automation
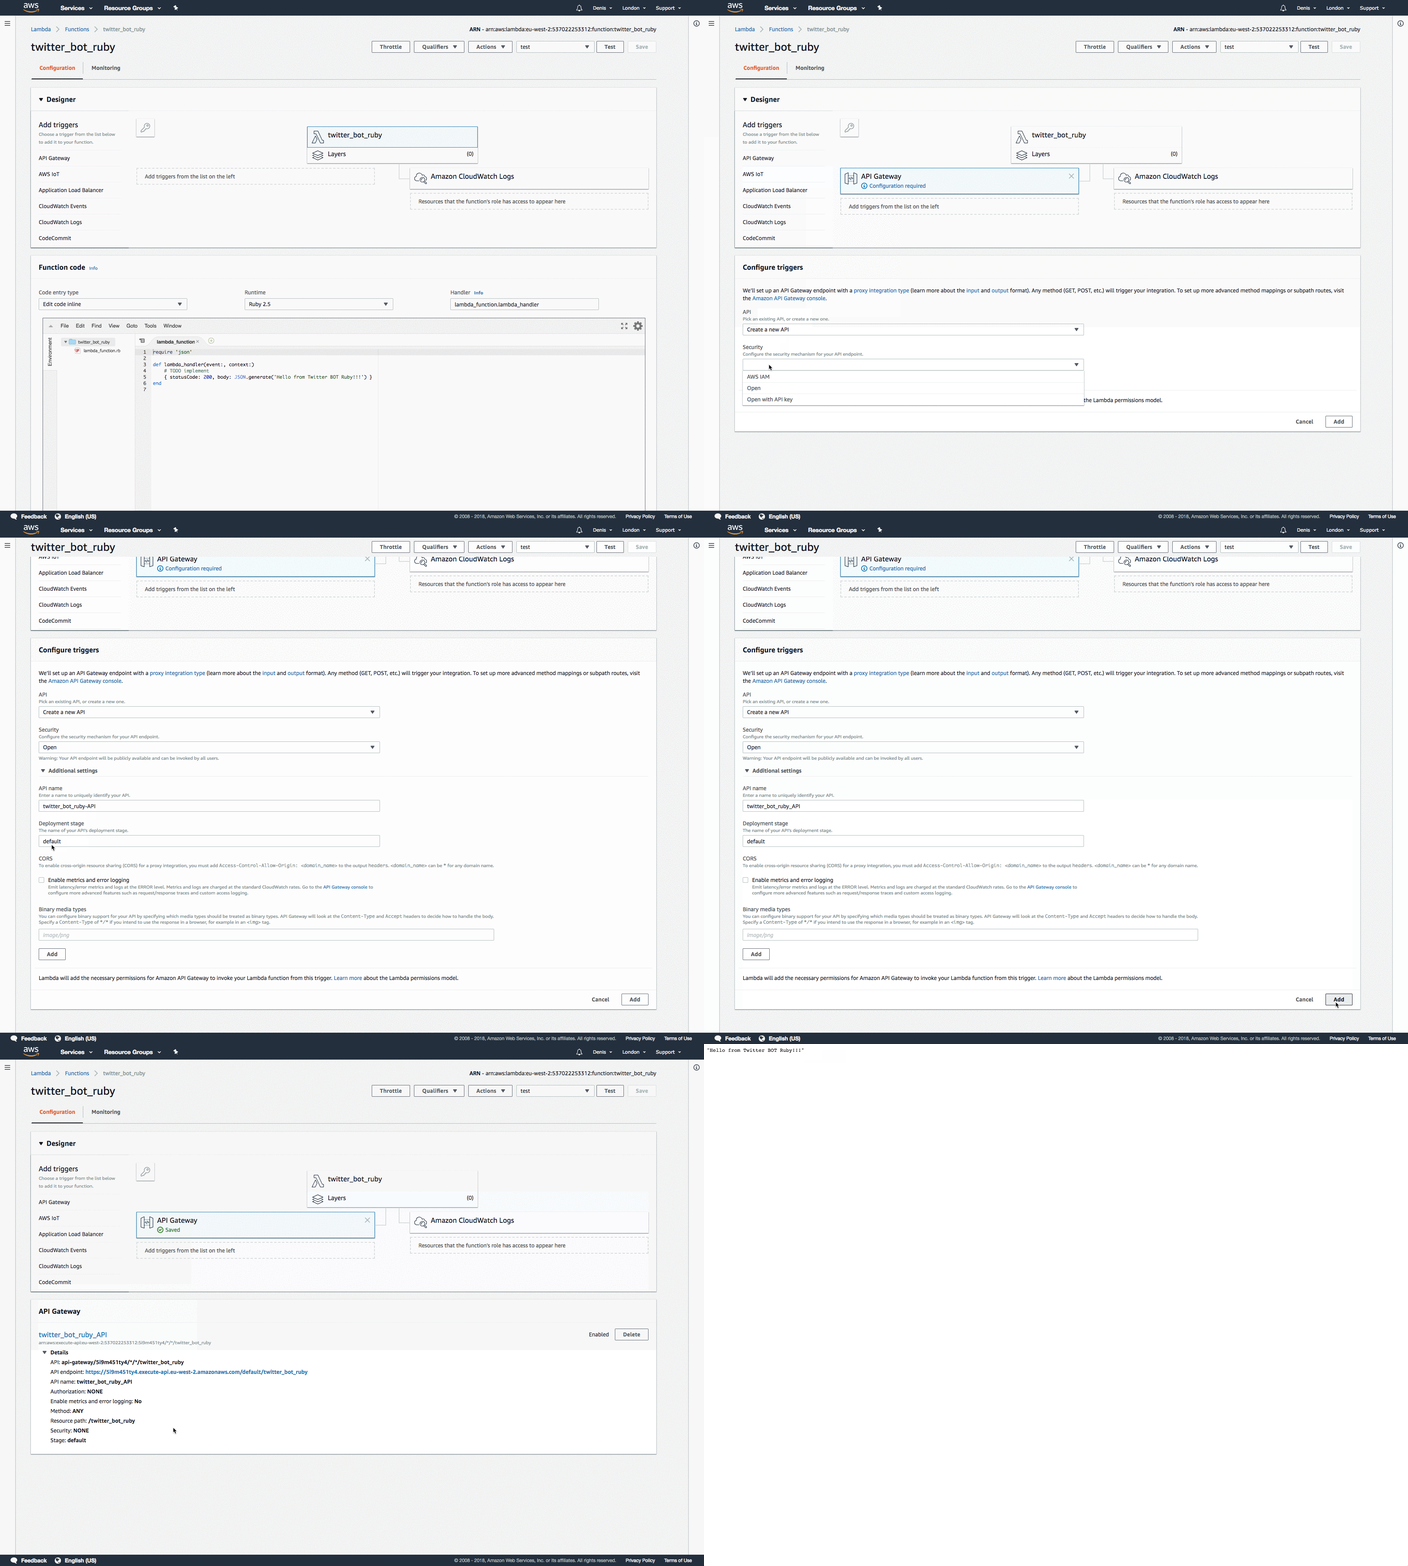
Now that we have our bot, we need to access it (you can test it from the Lambda function page). If you would like an endpoint for it, please do the following:

The above step simply involves adding and configuring the API Gateway trigger on the Lambda function. When you’ve done this you will be given an API endpoint.

Visit the endpoint to invoke the Lambda function. If all goes well you should see a post on Twitter.

Scheduling automation
If you need your function to be invoked regularly, you can schedule automation using AWS CloudWatch to create events that will execute your function on a regular schedule – this Amazon guide has more information on how to do that. Alternatively, you can use cron-job.org to achieve the same result – we cover how to go about setting this up in our previous post.
… and that’s it
You’ve built your first basic Ruby bot on AWS Lambda – congratulations!
Now it’s up to you to determine how complex you want to make it. In our previous post, we covered how to pull data from Asana but you should be able to connect to any source (Basecamp, Trello etc). Keep an eye on Serverless Ruby as they will be updating the site to include the best resources needed to build serverless applications.
Subscribe to our Twitter and Facebook for future posts about building new and exciting bots.
Need a bot built?
If you have a specific project you’d like to discuss, drop us an email.